Set Up Your Accounts and Explore Linux
The main goal of this lesson is simple: have fun with Linux and make the computer useful. The website is your lesson and reference. Each Google Doc below is a separate submission artifact.
- 3.1 Computer Detective: notes and instructions · make a copy of the assignment
- 3.2 Bashcrawl: notes and instructions · make a copy of the assignment
- 3.3 Sleek Out Linux Mint: notes and instructions · make a copy of the assignment
- Slides for all three lessons: Linux Start Here
Complete and submit each assignment separately. Do not combine their evidence or submit a separate history text file.
Complete the assignments in this order: 3.1 Computer Detective, 3.2 Bashcrawl, then 3.3 Sleek Out Linux Mint. The first two can be completed at home on Windows, Mac, Chromebook, Linux, or, with more difficulty, a phone. They also work offline in class from an installed Linux Mint system or the live USB. Assignment 3.3 requires Linux Mint Xfce, either installed or running from the live USB.
Download the Linux Offline Kit before disconnecting. It contains editable ODT and DOCX assignments, PDF reference copies, plain-text answer sheets, the Xfce appearance script, and the complete Bashcrawl game.
Learning goals
By the end of this page:
- I will be able to create and test safe user accounts on an assigned classroom computer.
- I will be able to personalize Linux Mint with the graphical user interface (GUI).
- I will be able to predict, test, and troubleshoot one configuration change using terminal evidence.
- I will be able to open the correct terminal on Windows, Linux, Mac, Chromebook, Android, or iPhone/iPad and use beginner commands.
- I will be able to create a folder and file, inspect processes, and review command history safely.
- I will be able to download and explore Bashcrawl with Git.
Before you begin
You may need:
- an assigned classroom computer with Linux Mint installed;
- the
minclassroom account and the classroom account password supplied directly by your teacher; - the account names or aliases supplied for students who share the computer;
- classroom Wi-Fi credentials supplied directly by your teacher; and
- the Linux Start Here class slides.
Do not change accounts or files on another computer. Do not use guest Wi-Fi, scan the school network, or try to connect to another person’s computer. Never put passwords, Wi-Fi credentials, student numbers, access tokens, recovery information, or other private information in a Google Doc, screenshot, or command history.
Extension work: create and test classroom accounts
This account activity supports the shared Linux computers, but it is not required evidence for Lessons 3.1, 3.2, or 3.3 unless your teacher assigns it separately.
Sign in as min. Open Menu > System > Users and Groups, then select Unlock. Use the classroom account password supplied directly by your teacher when Linux asks for administrator approval.
Create these three accounts only when your teacher has assigned the computer and approved the account names:
| Account | Username | Account type | Password |
|---|---|---|---|
| Your account | Create a unique, school-appropriate username with no spaces | Administrator | Create a private password you can remember |
| Other student 1 | Use the name or alias supplied by your teacher | Standard | Use the temporary password supplied directly by your teacher |
| Other student 2 | Use the name or alias supplied by your teacher | Standard | Use the temporary password supplied directly by your teacher |
Your username should not contain your student number, email address, or full legal name. Record usernames only if your teacher asks. Never record a password. Keep the min account as the classroom recovery account.
To test the accounts, sign out and sign in to each approved account. Confirm that each account opens normally and has a separate home folder. Sign back in to your own account before continuing. If an account does not work or an unexpected administrator warning appears, stop and ask your teacher for help.
3.3 Sleek Out Linux Mint
If anything here is unclear, incomplete, or could be explained better, improve it in your own copy. Use Suggesting mode if it is available. Otherwise, add a clearly labelled “Suggested improvement” with your revised wording. Include one sentence explaining why your version is clearer or more useful. Do not remove required work. Mr. A will review your change and may update the course website and future assignment documents if he agrees it helps. Improving a real instruction accurately is one way to demonstrate Level 4+ thinking.
Part 2: make Linux feel like your computer
Linux Mint Cinnamon and Linux Mint Xfce use different settings. Run echo "$XDG_CURRENT_DESKTOP" in Terminal. Use the Cinnamon script only when the result includes Cinnamon, and use the Xfce script only when it includes XFCE. Never force the wrong script to run.
Make a copy of 3.3 Sleek Out Linux Mint.
Submit ONE completed Google Doc in Google Classroom. It must contain a BEFORE screenshot, an AFTER screenshot, the configuration detective response, and all five short reflection answers. Do not attach the screenshots as separate files.
The handout was originally written around Xfce. Cinnamon students complete the same evidence and reflection using the Cinnamon controls and script identified on this page.
1. Save your BEFORE screenshot
Do this before changing any settings. Sign in to your own Linux account and show the full desktop with its wallpaper and bottom panel visible. Press Print Screen (PrtSc). If nothing happens, try Fn + PrtSc or search the application menu for Screenshot. Save the picture in your Pictures folder and insert it into the assignment Google Doc.

Show the whole desktop, not a cropped corner. Keep the wallpaper and full panel visible. This reference image is not a student submission. Image source: Linuxiac.
2. Get inspiration from Xfce makeovers
Watch the parts that interest you. Use the built-in settings in the next section. You do not need to copy either design, download a theme, run terminal commands, or install Compiz.
Customize Your Linux Mint XFCE: A Simple Guide by Specter-3924 shows a complete Linux Mint Xfce desktop makeover.
Making XFCE Look Better by NH Soft: start at 3:33 for wallpaper, 7:32 for themes, and 12:49 for the panel. Skip downloads, terminal commands, and the later Compiz effects.
Three realistic built-in-only design ideas
Pick one direction or mix ideas. Theme names can vary slightly between classroom computers.
| Design direction | Wallpaper | Theme or icons | Panel |
|---|---|---|---|
| Calm study desktop | Choose a quiet nature or abstract built-in image | Try a light Mint-Y style and a simple built-in icon set | Keep it at the bottom and set a comfortable row size around 38 to 42 pixels |
| Dark coding desktop | Choose a darker built-in image with little visual clutter | Try a built-in dark Mint-Y style and readable icons | Move it to the top or keep it at the bottom, then make it slightly taller |
| Easy-to-see desktop | Choose an uncluttered image that does not hide labels | Choose the clearest high-contrast built-in style available | Increase the row size to about 46 to 52 pixels and keep the menu, network, sound, and clock easy to find |
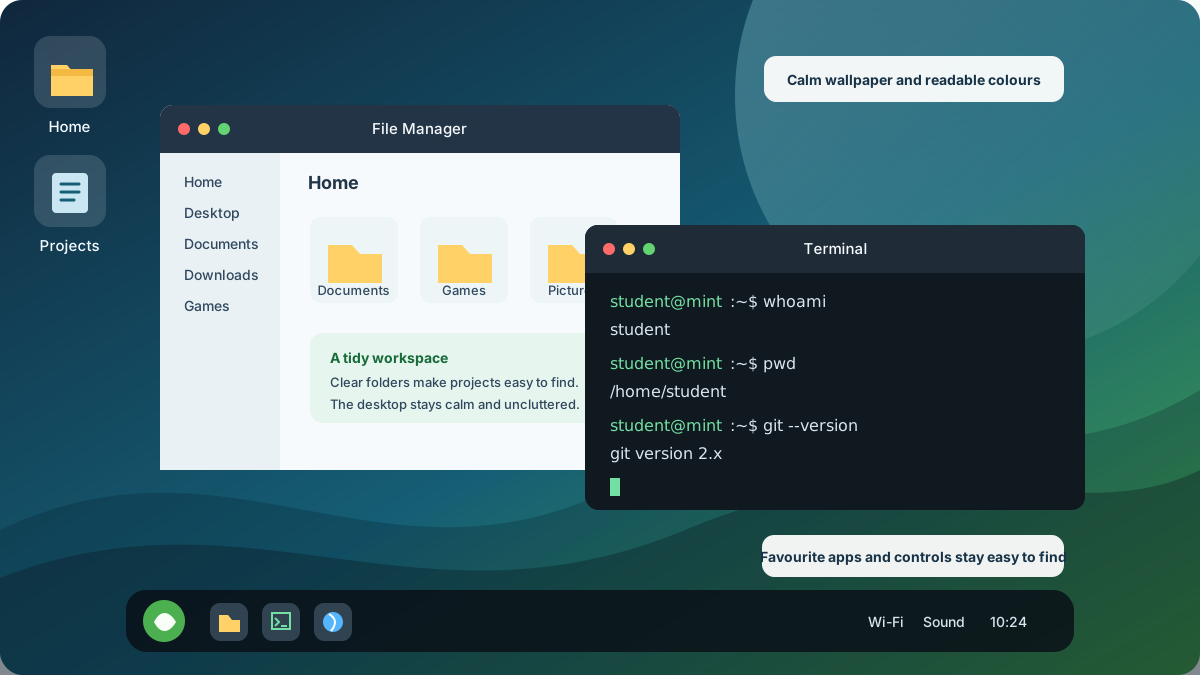
This course example shows one possible finished direction. Your design should reflect your own choices and remain readable.
3. Make the three required changes
Use the settings already included with Linux Mint. Do not download themes, packages, or desktop effects without teacher permission. The optional course scripts below are the only approved appearance scripts for this activity.
| Change | Linux Mint Cinnamon | Linux Mint Xfce |
|---|---|---|
| Wallpaper | Right-click the desktop and choose Change Desktop Background | Right-click the desktop and choose Desktop Settings |
| Theme or icons | Open System Settings > Themes | Open Settings > Appearance |
| Panel | Open System Settings > Panel, or right-click the panel | Right-click the panel and choose Panel > Panel Preferences |
The screenshots below show Xfce. Cinnamon students use the matching Cinnamon path in the table.
Change A: wallpaper

- Right-click an empty part of the desktop.
- Select Desktop Settings, then Background.
- Choose a different built-in picture. Close the window to see the result.
Example: choose a simple image whose light and dark areas still let you read desktop icon labels. Screenshot source: It’s FOSS.
Change B: theme or icons

- Open Menu > Settings > Appearance. If you cannot find it, type
Appearanceinto the menu search box. - Open the Style tab and try a different built-in style. This changes application windows, menus, buttons, and colours.
- You may also open the Icons tab and choose a different built-in icon set. Keep labels and controls readable.
Example: compare one light and one dark Mint-Y variant, then keep the one that gives better contrast with your wallpaper. Screenshot source: Xfce Project.
Change C: panel
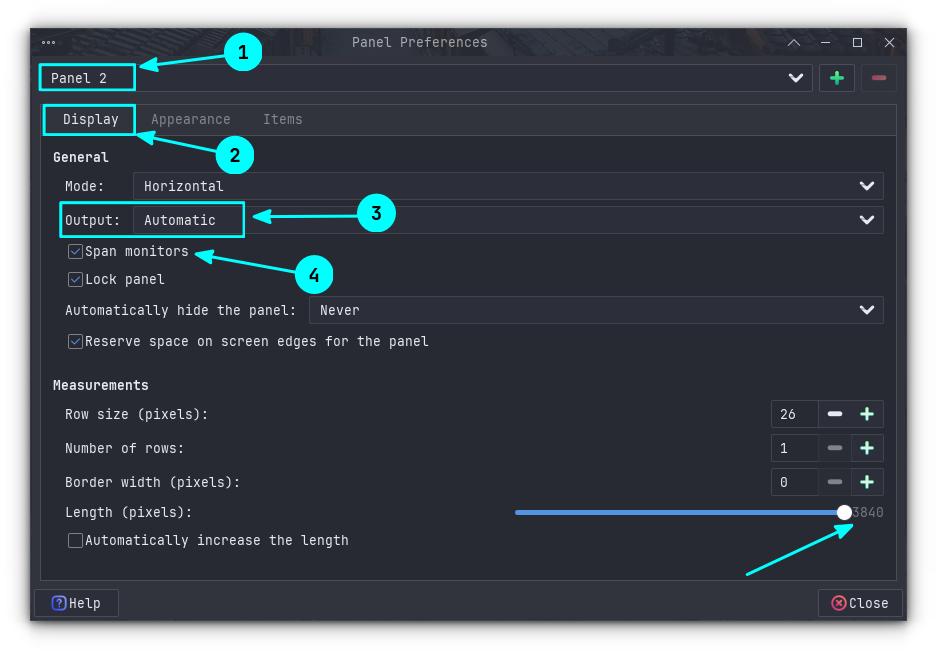
- Right-click the bottom panel, which is the bar with the menu and clock.
- Choose Panel > Panel Preferences. You can also search for
Panelin the menu. - Change the Row size first. A small change, such as 36 pixels to 42 pixels, is easy to see and easy to reverse.
- If you want another change, move the panel to the top or adjust its appearance. Close Panel Preferences when finished.
Do not delete the panel or remove the application menu, network, sound, or clock controls. Screenshot source: It’s FOSS.
If a setting looks wrong, return to the same settings window and change it back. If you cannot restore the panel or essential controls, stop and ask for help.
Optional shortcut for Cinnamon
The Cinnamon script is designed for Linux Mint Cinnamon, including Cinnamon 5.6 on Linux Mint 21.1. It changes only a small set of current-user appearance settings. It does not use sudo, install software, download themes, remove applets, or modify personal files.
It first shows a preview. If you continue, it creates a backup and requires you to type APPLY. Its menu also provides a Restore option.
Download tej-cinnamon-style.sh
Run one command at a time:
INPUT
cd ~/DownloadsINPUT
less tej-cinnamon-style.shPress q to leave less.
INPUT
chmod +x tej-cinnamon-style.shINPUT
./tej-cinnamon-style.shChoose the Windows-style or Mac-inspired preview. Read the proposed changes, then type APPLY only if you want them. Choose Restore from the menu to return to the most recent settings saved by the course script.
The script supports one Cinnamon panel. If it detects multiple panels, it stops without changing anything and directs you to use System Settings > Panel manually.
The panel and window-setting names come from the official Cinnamon settings schema and official window settings module.
Optional shortcut for Xfce
After you save the required BEFORE screenshot, you may use the course appearance script on Linux Mint Xfce only. It changes settings for your account without sudo, saves a backup of the current Xfce configuration, and offers two starting points:
- Windows-style: a full-width bottom panel with larger controls and desktop icons.
- Mac-inspired: a centred, auto-hiding bottom panel with larger launcher icons and window buttons on the left.
The presets are starting points, not copies of Windows or macOS. You still decide whether the result is readable and useful.
The script uses Xfce’s own xfconf-query tool, following the same general approach documented by the Xfce Project and used in Linux Mint community customization scripts. This course version changes only a small, checked set of visual settings.
Open Terminal and run one command at a time:
INPUT
cd ~/DownloadsINPUT
curl -fLO https://andrewandrade.ca/tech-edu-resources/assets/linux/tej-xfce-style.shInspect the script before running it:
INPUT
less tej-xfce-style.shPress q to leave less. Then make the script executable and run it:
INPUT
chmod +x tej-xfce-style.shINPUT
./tej-xfce-style.shChoose option 1 or 2. Take the required AFTER screenshot only after you have checked that the menu, network, sound, and clock are still easy to use.
The script creates ~/.config/tej-xfce-style.conf. Open it in Linux Mint’s text editor:
xed ~/.config/tej-xfce-style.confTry changing one value, save the file, run ./tej-xfce-style.sh again, and choose option 3. For example, PANEL_SIZE=52 makes the panel taller, PANEL_LENGTH=90 makes it shorter, and DESKTOP_ICON_SIZE=64 makes desktop icons larger. Keep panel length from 40 to 100 and do not remove required controls.
Configuration detective: predict, test, and solve
Do not stop at copying commands. Use the script as a small problem-solving experiment:
- Run
./tej-xfce-style.shand choose option4to record the current values. - Pick one safe variable in
~/.config/tej-xfce-style.conf. Before editing it, write what you predict will change and what should stay the same. - Change only that variable in
xed, save the file, rerun the script, and choose option3. - Compare the result with your prediction. If it did not work as expected, read the terminal message, choose option
4again, and check the spelling and allowed range in the configuration file. - Use the built-in help instead of waiting for the next instruction:
INPUT
xfconf-query --helpThen inspect the panel settings and their current values:
INPUT
xfconf-query -c xfce4-panel -l -vFind the property that matches the variable you changed. Explain what the channel, property, and value represent. The Xfce xfconf-query guide explains the command options, and the Xfce Panel guide explains panel size, length, and hiding behaviour.
Make one useful change that is not given as an exact value above. State your goal, predict the result, test it, and explain what you changed after seeing the result. If the first attempt fails, describe the evidence you used to correct it. Do not use sudo, delete a panel, remove required controls, or run an unfamiliar command that changes files.
4. Save your AFTER screenshot
Make sure the updated wallpaper and panel are visible. You may leave File Manager open so the theme is also visible. Take another screenshot and insert it into the same Google Doc.
5. Answer all five reflection questions
In your assignment Google Doc, answer:
- What wallpaper did you choose, and where did you change it?
- What theme or icon change did you make, and which setting did you use?
- What did you change about the panel, and how did you do it?
- Which change made the desktop look better or easier to use, and why?
- What did you predict, test, and learn from your configuration change? If something went wrong, explain the evidence you used to fix it.
After completing the required work, you may change fonts or pointer size, add a favourite application shortcut, arrange desktop icons, or investigate another built-in appearance setting. Do not install a theme or desktop effect without permission.
Extension work: network and software exploration
These activities build useful Linux skills, but they are not required evidence for Assignments 1, 2, or 3 unless your teacher assigns them separately.
Check the network with the GUI
- Select the network icon in the panel.
- Connect using credentials supplied directly by your teacher. Do not use guest Wi-Fi.
- Open the connection information or network settings.
- Identify whether the connection uses Wi-Fi or Ethernet. Keep local addresses in private classroom work only.
- Open the browser and visit the TEJ Notes website.
If a warning appears, credentials are rejected, or a result differs significantly from these instructions, stop and ask for help. Do not change security settings or scan the network.
Install approved software
Open Software Manager from the application menu. Search for Git and install it only if it is missing and your teacher has approved the installation. You may also choose one school-appropriate game or useful application, read its description and system requirements, and ask for approval before installing it.
Use Software Manager, an operating system’s official documentation, or the official Bashcrawl GitLab repository. Do not paste installation commands from advertisements, comments, forums, or unknown sites. If installation requires administrator access and you do not have permission, stop and ask your teacher.
3.1 Computer Detective
If anything here is unclear, incomplete, or could be explained better, improve it in your own copy. Use Suggesting mode if it is available. Otherwise, add a clearly labelled “Suggested improvement” with your revised wording. Include one sentence explaining why your version is clearer or more useful. Do not remove required work. Mr. A will review your change and may update the course website and future assignment documents if he agrees it helps. Improving a real instruction accurately is one way to demonstrate Level 4+ thinking.
Part 5: meet the terminal
Make a copy of 3.1 Computer Detective: Terminal Quest.
Submit ONE completed Google Doc in Google Classroom. Paste the complete, reviewed command history into that document. Do not submit a separate history text file.
At home: complete Computer Detective on Windows with WSL or Git Bash, Mac, a Chromebook Linux environment, Linux, Android, or iPhone/iPad.
In class without Internet: complete it after Linux Mint is installed or while Linux Mint is running from the bootable USB. The core commands work offline. Download the TEJ Linux Offline Kit before disconnecting for offline assignment and answer-sheet copies. Making Ethernet cables and bringing every computer online will take time, so this work is ready while you wait.
1. Open the correct terminal
Windows with WSL
Open Start and search for WSL, Ubuntu, or the name of the installed Linux distribution. Open the matching app. Run the Linux assignment commands there, not in PowerShell.
If WSL is not installed, ask the computer owner or teacher for permission. Installation requires administrator access and may require a restart. With permission, open PowerShell as Administrator and run:
INPUT
wsl --installRestart if Windows asks. If installation is blocked, a security warning appears, or you are unsure which distribution opened, stop and ask for help. Follow the official Microsoft WSL installation guide when needed.
Windows with Git Bash
With the computer owner’s permission, install Git for Windows and open Git Bash from Start. Git Bash provides Bash, Git, and common Unix-style commands inside Windows.
Git Bash is useful, but it is not Linux or Unix. Windows still supplies the file system, permissions, processes, and system information. Paths, available commands, and outputs can therefore differ from WSL, Linux, or macOS. Use Git Bash for file navigation, Git, shell practice, scripts, and Bashcrawl. If a Computer Detective step needs a Linux process tool, use the Windows alternative given in that step.
Linux Mint or Ubuntu
Press Ctrl + Alt + T, or search the application menu for Terminal. WSL is not needed on a Linux computer.
Mac
Press Command + Space, search for Terminal, and press Return. You can also open Applications > Utilities > Terminal.
Chromebook with the Linux development environment
On a personal Chromebook or an owner account, open Settings > About ChromeOS > Developers. Beside Linux development environment, select Set up and follow the prompts. Setup needs Internet and can take several minutes. When it finishes, open Terminal from the Launcher and select the Linux terminal.
A school-managed Chromebook may hide or block this feature. Do not remove management, change security settings, or use Developer Mode. Use another supported device if the normal Linux development environment is unavailable. Follow the official Google Chromebook Linux setup guide when needed.
Android phone or tablet
Install Termux from F-Droid, then open Termux. Do not use the outdated Play Store build. The assignment commands work directly in Termux.
iPhone or iPad
Install iSH Shell. Open iSH and run these commands one at a time so the remaining instructions use Bash:
INPUT
apk updateINPUT
apk add bashINPUT
bashUsing a phone is slower and more difficult than using a computer, but Android and iPhone both work. A Bluetooth keyboard makes it easier. If you are waiting for a classroom computer or Internet connection, use your phone to begin or continue the assignment instead of doing nothing. 📱💻
2. Identify the account and current folder
Run one command at a time. Read the result and enter the requested answer in your Google Doc.
INPUT
whoamiINPUT
hostnameINPUT
pwdINPUT
lsINPUT
ls -aEXAMPLE OUTPUT
Desktop Documents Downloads Music PicturesYour username, computer name, path, files, and hidden items will differ. A shell prompt may end with $ or %; do not type that prompt symbol as part of a command.
3. Investigate the operating system
INPUT
uname -sINPUT
uname -mINPUT
df -h .Find the row for the filesystem containing the current folder. Record the value in the Avail column from that row. Do not copy a value from another row such as tmpfs. The device name is different on different computers, so it may not be /dev/sda2.
INPUT
uptimeRecord the system name, machine or CPU type, available space, and uptime in your Google Doc. On a Mac, the system name may be Darwin. In WSL, the system name is normally Linux because Linux is running inside Windows.
4. Create the terminal-quest folder and hello.txt
Start at the file-system root so you can see the move. Run each command separately and press Enter after every command. cd means change directory, pwd means print working directory, and ~ means the signed-in user’s home folder.
INPUT
cd /INPUT
pwdNow return to your home folder and check the location again:
INPUT
cd ~/INPUT
pwdCompare the two results. cd / moves to the root of the file system. cd ~/ returns to your own home folder.
INPUT
mkdir -p terminal-questINPUT
cd terminal-questINPUT
pwdINPUT
echo Hello from my computer > hello.txtINPUT
lsINPUT
cat hello.txtEXAMPLE OUTPUT
Hello from my computerReturn to your home folder and confirm your location:
INPUT
cd ~INPUT
pwd5. View running processes
On WSL, Linux Mint, or Ubuntu, try:
INPUT
htopIf htop is not installed, use top, or ask permission before installing software. On Ubuntu-based systems, the approved installation commands are:
INPUT
sudo apt updateINPUT
sudo apt install htop -yOn a Mac, use htop only if it is already installed. Otherwise run:
INPUT
topPress q to leave htop or top. Observe one CPU and one memory detail. Never end an unfamiliar process. If installation is blocked or asks for access you do not have, use top and ask for help.
On Android with Termux or iPhone/iPad with iSH, use top. Press q to leave it. Do not try to stop unfamiliar phone processes.
In Git Bash, top and htop are not normally included. Run tasklist | more, or open Windows Task Manager, then record one running process and one CPU or memory observation. This difference is useful evidence that Git Bash is a Windows shell environment rather than a Linux system.
6. Review and copy the complete command history
History contains commands, not their output. Review it before copying. Remove or redact passwords, tokens, personal names, private paths, Wi-Fi credentials, and other private information. If you see a password or token, do not paste it. Stop and ask for help, and change any exposed credential.
Windows WSL, Windows Git Bash, Linux Mint, or Ubuntu using Bash
Review the history:
INPUT
historyOn Windows WSL or Git Bash, copy the complete history to the Windows clipboard:
INPUT
history | clip.exeOn Linux Mint or Ubuntu, first check the desktop session:
INPUT
echo $XDG_SESSION_TYPEIf the result is x11, ask permission to install xclip if needed, then copy:
INPUT
sudo apt install xclip -yINPUT
history | xclip -selection clipboardIf the result is wayland, ask permission to install wl-clipboard if needed, then copy:
INPUT
sudo apt install wl-clipboard -yINPUT
history | wl-copyMac using the default zsh shell
Review the complete history:
INPUT
history 1Copy it to the Mac clipboard:
INPUT
history 1 | pbcopyIf the Mac uses Bash instead of zsh, use history and history | pbcopy.
Android or iPhone/iPad using Bash
Review the complete history:
INPUT
historyTouch and hold in the terminal, select the reviewed history, and copy it. If the output is long, save it to a file and display it before selecting the text:
INPUT
history > ~/terminal-quest-history.txtINPUT
cat ~/terminal-quest-history.txtSwitch to your Google Doc, touch and hold in the FULL COMMAND HISTORY box, and choose Paste. Remove private information before submitting.
Paste the complete, reviewed history into the labelled box in your Terminal Quest Google Doc. Confirm that it includes the activities you tried. Review the pasted text again before submitting. Submit only that completed Google Doc.
Repeat Sections 1 and 2 on a second operating system and explain one meaningful difference in the output. You may use another physical computer, a Linux Mint live USB, or VirtualBox inside Windows, Mac, or Linux. Ask the computer owner before installing software, and do not change firmware, security, or virtualization settings without permission. This is worth up to 5 bonus marks.
3.2 Bashcrawl
If anything here is unclear, incomplete, or could be explained better, improve it in your own copy. Use Suggesting mode if it is available. Otherwise, add a clearly labelled “Suggested improvement” with your revised wording. Include one sentence explaining why your version is clearer or more useful. Do not remove required work. Mr. A will review your change and may update the course website and future assignment documents if he agrees it helps. Improving a real instruction accurately is one way to demonstrate Level 4+ thinking.
Part 6: clone and play Bashcrawl
Make a copy of 3.2 Bashcrawl Terminal Adventure.
Submit ONE completed Google Doc with all four reflection answers and at least one readable terminal screenshot. No history file is required.
At home: Bashcrawl works through Windows WSL, Windows Git Bash, Mac, a Chromebook Linux environment, Linux, Android, or iPhone/iPad.
In class without Internet: after Linux Mint is installed or while it is running from the bootable USB, copy the included bashcrawl folder from the TEJ Linux Offline Kit and play without downloading anything.
Bashcrawl is a terminal adventure. Folders are rooms and files contain clues. There is no required final room and no time limit. Explore for as long as you can, return another day if you want, and record the furthest room you reached.
1. Open Terminal and check Git
- Windows WSL: Open Ubuntu or the installed Linux distribution from Start.
- Windows Git Bash: With the computer owner’s permission, install Git for Windows and open Git Bash. Git Bash is not Linux or Unix, but the Bashcrawl commands used here are mostly the same.
- Linux Mint or Ubuntu: Press Ctrl + Alt + T, or open Terminal from the application menu.
- Mac: Press Command + Space, search for Terminal, and press Return.
- Chromebook: Open the Linux Terminal from the Launcher. If Linux is not already enabled, use Settings > About ChromeOS > Developers > Linux development environment > Set up on a personal or owner account. A school-managed Chromebook may block this feature.
On a Chromebook, extract the offline kit in the Files app. Move the complete bashcrawl folder into Linux files, then move it into ~/Games from Terminal before starting the game. Linux setup requires Internet once, but the included Bashcrawl folder can be played offline afterward.
The core Bashcrawl commands are mostly the same in WSL, Git Bash, Linux, macOS, ChromeOS Linux, Termux, and iSH: ls, cd, pwd, cat, and git clone. The prompt, home-folder path, permissions, and available system commands may differ.
Use a phone or tablet
You can also play Bashcrawl on a phone or tablet if you have access to one.
- Android: Install Termux from F-Droid. Open Termux, then run these commands one at a time:
INPUT
pkg updateINPUT
pkg install git- iPhone or iPad: Install iSH Shell. Open iSH, then run these commands one at a time:
INPUT
apk updateINPUT
apk add bash gitINPUT
bashAfter setup, continue with the same Bashcrawl commands below. Using a phone is slower and more difficult than using a computer, but Android and iPhone both work. A Bluetooth keyboard makes it easier. If you are waiting for a classroom computer or Internet connection, use your phone to begin or continue the assignment instead of doing nothing. 📱💻
INPUT
git --versionEXAMPLE OUTPUT
git version 2.43.0Your version may differ. If Git is missing on WSL, Ubuntu, or Linux Mint, ask permission before running sudo apt update and sudo apt install git -y. On a Mac, follow the Apple Command Line Tools prompt only with the computer owner’s permission. Stop and ask for help if installation is blocked.
2. Download and start Bashcrawl
Run one command at a time:
INPUT
cd ~INPUT
mkdir -p GamesINPUT
cd GamesINPUT
git clone https://gitlab.com/slackermedia/bashcrawl.gitIf Bashcrawl is already downloaded in ~/Games, skip the clone command.
INPUT
cd bashcrawl/entranceINPUT
cat scrollgit clone downloads a working copy of the repository into a new folder. It does not need administrator access. Never add sudo to that command.
3. Explore the dungeon
Useful commands include:
INPUT
pwdINPUT
lsINPUT
ls -aINPUT
cat filenameINPUT
cd directoryINPUT
cd ..Replace filename and directory with names you actually see. Read every scroll file you find. If a command does not work, read the message, try ls or ls -a, reread the clue, or go back one room. Do not use sudo inside the game.
4. Record and submit your progress
In the Bashcrawl Google Doc:
- Record the furthest room or path you reached. Run
pwdin that room if you need the path. - Answer what clue, object, or surprise you discovered.
- Name one command you learned or used and explain what it does.
- Explain what you tried when you got stuck and whether it worked.
- Insert at least one readable screenshot showing the terminal at your furthest room or an interesting clue.
Submit ONE completed Google Doc in Google Classroom. There is no required final room, no time limit, and no history file for this assignment.
Helpful resources
- Review the Linux Start Here class slides for the installation, account, terminal, and Bashcrawl sequence.
- Read the official Bashcrawl instructions if you need help starting the game.
- Review the Bashcrawl project on GitLab to see where the game came from.
- Read the Git documentation for
git clonewhen you want to understand the download command in more detail. - Use the Ubuntu command-line tutorial for another beginner-friendly introduction to the terminal.
- Read the GNU Bash explanation of command history to learn what Bash saves.
- Explore the school-appropriate Learn Linux TV YouTube channel for beginner Linux and terminal demonstrations.
- Try Linux Journey for short lessons about commands, permissions, processes, and networking.
- Try GameShell or OverTheWire Bandit only with teacher approval.
Review
You can now separate three different kinds of evidence: the complete reviewed command history belongs in 3.1 Computer Detective, Bashcrawl progress belongs in 3.2 Bashcrawl, and visual customization belongs in 3.3 Sleek Out Linux Mint. Each assignment is submitted as one Google Doc.