Tinkercad Faux-Enamel Badge | PCSS V1 → Original V2
The project
Complete the project in two versions:
- Version 1 — PCSS Warriors practice badge: rebuild the supplied school roundel as a 60 mm brooch. Print the structure in white filament, then add Port Credit navy and Warriors gold as teacher-approved faux-enamel fills. The lettering and circular ring outlines must remain white.
- Version 2 — original logo: apply the same construction method to your own personal, business, club or community logo. Simplify it into two or three large colour regions that can be printed and filled cleanly.
Version 1 is guided practice. Version 2 shows that you can transfer the process to your own design.
New to Tinkercad? Start here
Complete this short introduction before beginning the logo. Keep Tinkercad open in one window and this lesson or the video open beside it. Pause whenever you need to copy an action.
Watch and follow
- Watch the interface tour beginning at 4:45.
- At 7:40, open a new design and follow along with the first build.
- At 28:47, watch how an STL is exported for 3D printing.
Open Autodesk’s guided 3D-design basics Open the complete video
Five-minute practice build
Before using your logo, prove that you can control a simple shape:
- Create a new 3D design and rename it
lastname-tinkercad-practice. - Drag a Cylinder onto the workplane. Set its length and width to 30 mm and its height to 3 mm.
- Orbit, pan and zoom until you can inspect the top, front and side.
- Duplicate the cylinder. Make the copy 24 × 24 × 1 mm and raise it 3 mm above the workplane.
- Select both cylinders, choose Align, and select the two centre dots.
- Group the parts, then undo once so you know how to recover from a mistake.
- Export the practice object as an STL.
You are ready when you can view, size, raise, align, group, undo and export without guessing. Autodesk also provides a printable Tinkercad getting-started and keyboard-shortcut guide.
Version 1 reference — PCSS Warriors

Download the supplied PCSS Warriors PNG
This school mark is the authorized class reference for Version 1. Preserve the recognizable roundel, lighthouse, waves and maple leaf, but simplify tiny details when they would make weak walls or unfillable pockets.
Required colour plan
| Finished region | Material or finish | Requirement |
|---|---|---|
| Lettering and circular ring outlines | White PLA | Leave exposed and clean; do not cover with polish |
| Outer band, lighthouse, waves and maple leaf | Port Credit navy fill | Use the teacher-approved navy colour |
| Centre field and gold accents | Warriors gold fill | Use the teacher-approved gold colour |
| Thin dividers required to contain a fill | White PLA | Keep at least 1.2 mm wide |
The finished piece is multicolour, but it is printed as one white PLA model. The navy and gold are added after printing as faux-enamel fills. Tinkercad colours are only a planning aid and do not change the STL.
Version 2 — your own logo
After Version 1 has passed its cavity test, create a second badge from an original logo you designed. Do not copy a company, team, game, social-media or clothing logo.
Your Version 2 design must:
- use at least two fill colours plus visible white filament structure;
- have large, completely enclosed colour regions;
- keep every important wall and stroke at least 1.2 mm wide;
- remove tiny text and details that will not print or fill cleanly; and
- keep a flat back for a glue-on finding.
Read the construction drawing
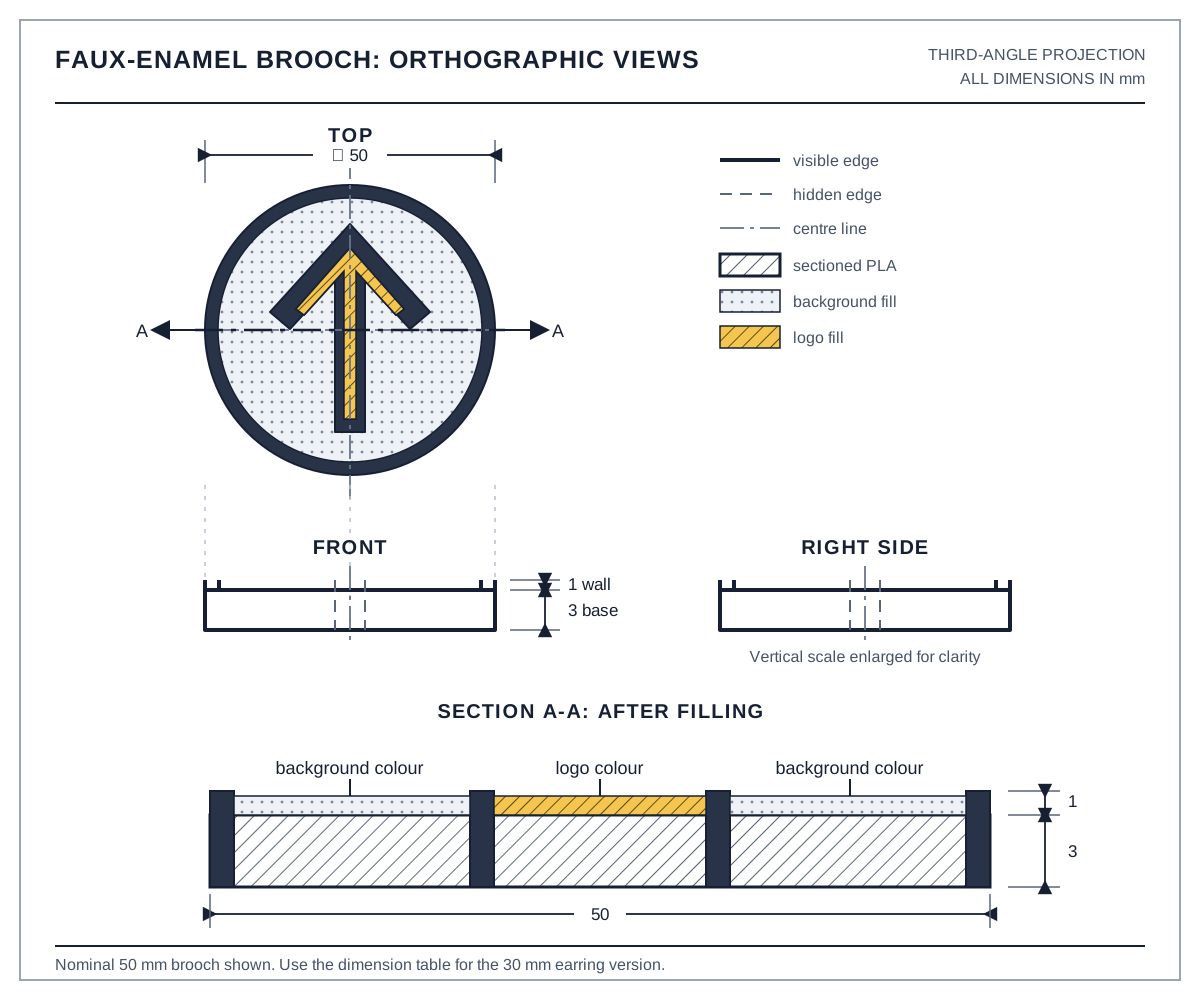
Read Figure 2 as a third-angle orthographic drawing. The circular decorated face is the front view. Its thin top view is aligned directly above it, and the thin right-side view is aligned directly to its right. Section A–A cuts through the centre of the front view to show the construction: a 3 mm solid base, 1 mm raised walls and two separately fillable colour pockets. The section is not another exterior view.
See the finished idea
These photographs show the process and the range of products possible. Your artwork must still be original.
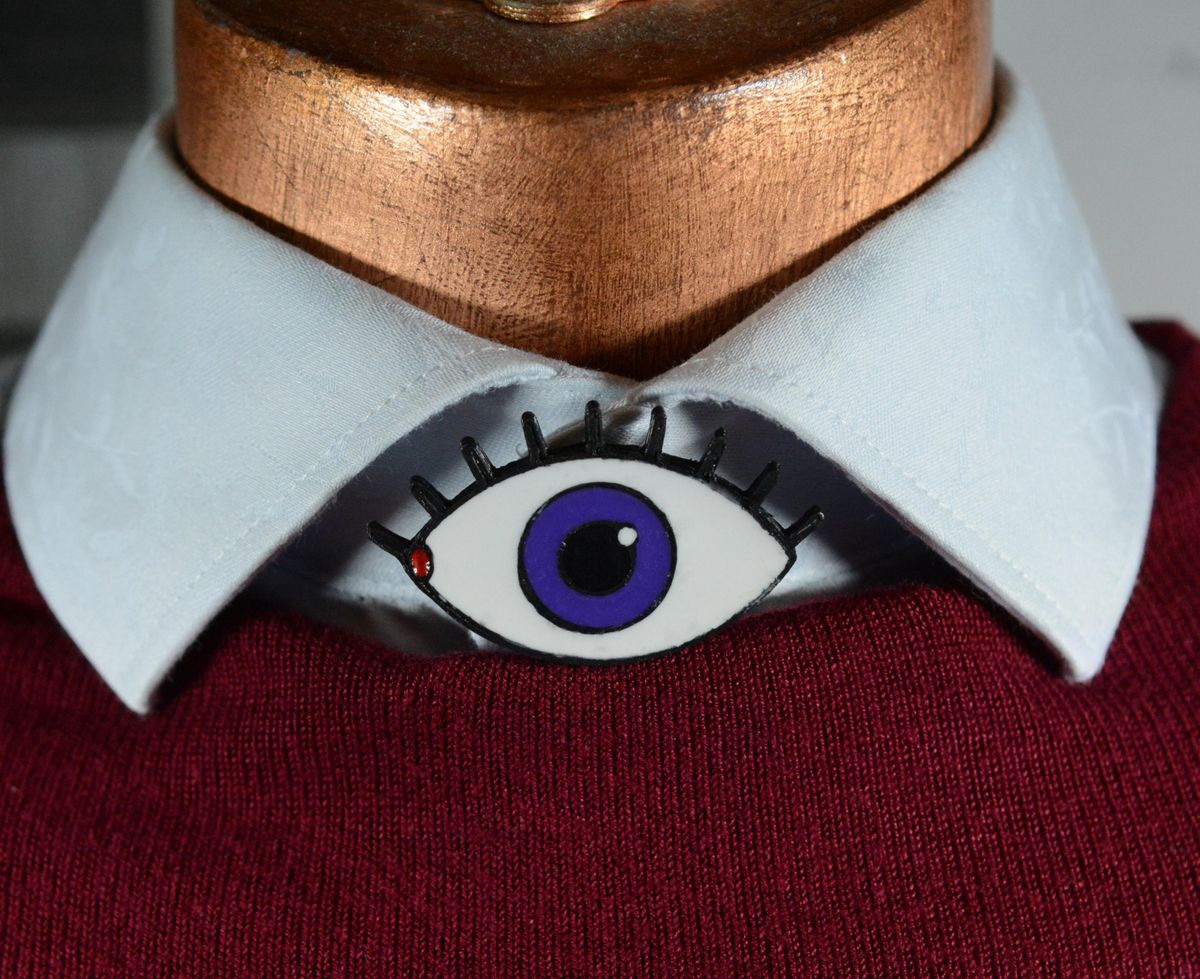


The reference photographs and screenshots by kura_kura are used under the CC BY-NC-SA 4.0 licence and are not included in this site’s CC BY-SA licence. Select any image to open the original project and full context.
Dimensions
| Feature | Version 1: PCSS | Version 2: original |
|---|---|---|
| Circle diameter | 60 mm | 50 mm brooch or 30 mm earring |
| Main artwork width | about 52 mm | 38–40 mm brooch or 22–24 mm earring |
| Solid base | 3 mm | 3 mm |
| Raised white structure | 1 mm | 1 mm |
| Fill depth | 0.8–1 mm | 0.8–1 mm |
| Minimum wall or stroke | 1.2 mm | 1.2 mm |
| Finished printed thickness | about 4 mm | about 4 mm |
Use the 30 mm earring size only for an extremely simple Version 2 logo. The PCSS badge is always a 60 mm brooch so its curved lettering remains printable.
Download the starter files
- PCSS Warriors reference PNG
- Circular base SVG
- Circular rim SVG
- AA raised-detail example SVG
- AA brooch teacher-example STL



For Version 2, you also need the transparent SVG from your Photopea logo assignment.
Part A — prepare the PCSS artwork in Photopea
The PCSS PNG is a reference image, not yet Tinkercad geometry. Separate it into fabrication layers before importing it.
- Open Photopea and open
pcss-warriors.png. - Follow the Photopea bitmap-to-vector workflow, using a small colour count so the navy, gold and white areas remain distinct.
- Remove the transparent background and any accidental edge fragments.
- Separate the vector result into named groups:
WHITE STRUCTURE,NAVY REGIONSandGOLD REFERENCE. - Keep the white lettering and both circular outlines in
WHITE STRUCTURE. - Keep the outer band, lighthouse, waves and maple leaf in
NAVY REGIONS. - Use
GOLD REFERENCEto check the intended fill areas. Gold does not need to become a raised solid shape. - Export the white group as
pcss-white-structure.svg. - Export the navy group as
pcss-navy-regions.svg.
Before leaving Photopea, zoom in and confirm that WARRIORS, PORT CREDIT and both ring outlines are complete. These are the features that must remain white filament in the finished badge.
Part B — build Version 1 in Tinkercad
Step 1 — start the design
- Sign in to Tinkercad.
- Select Create → 3D Design.
- Rename the design
lastname-pcss-faux-enamel-v1. - Keep Snap Grid at 1.0 mm while setting the main heights.
Step 2 — make the 60 mm base
- Import
circle-base.svg. - Set both dimensions to 60 mm.
- Set its Height to 3 mm.
- Centre it on the workplane.
The whole part will be printed in white PLA. The flat rear surface will later receive a glue-on brooch finding.
Step 3 — add the white outside rim
- Import
circle-rim.svgat 60 mm. - Set its Height to 1 mm.
- Raise it 3 mm above the workplane.
- Align it horizontally and vertically with the base.
Step 4 — import the white lettering and rings
- Import
pcss-white-structure.svg. - Keep Fill Mode at Default so the letters and ring outlines remain solid white filament.
- Scale the artwork to fit inside the 60 mm outside rim without touching it.
- Set its Height to 1 mm and raise it 3 mm above the workplane.
- Align it to the centre of the base.
Do not convert the lettering or circular outlines into holes. They are visible white features in the finished badge.

Step 6 — align, group and perform the leak test


- Select the base, outside rim, white structure and navy-region dividers.
- Select Align and use the two centre dots.
- Orbit the model and inspect it from the top, side and bottom.
- Confirm that the back is flat.
- Confirm that every navy and gold fill area is completely enclosed.
- Confirm that the lettering and circular outlines remain solid raised features.
- Group the parts.
Do not export if a cavity leaks through the rim, a letter is broken, a divider is under 1.2 mm, or a pocket is too small for a brush or toothpick.

Step 7 — export Version 1
- Select the grouped model.
- Select Export → The selected shape → .STL.
- Name the file
lastname-pcss-faux-enamel-v1.stl. - Open it in the class slicer and inspect every layer.
- Print it flat, back down and decorated face upward, using the teacher-approved white filament profile.
Part C — finish Version 1
- Let the print cool completely and remove loose strings.
- Test the navy and gold finish on a failed print or sample first.
- Place a small drop of navy fill into the outer-band and navy-detail pockets.
- Place gold fill into the centre-field and gold-accent pockets.
- Guide each colour to its edges with the brush or a toothpick. Do not cover the raised white lettering, rings or divider walls.
- Apply two or three thin coats, allowing each coat to dry.
- Let the finished piece cure fully before gluing hardware or wearing it.
Use only teacher-approved polish and finishing products, with the ventilation and protective procedures required by the school.
Part D — create Version 2
- Duplicate the Version 1 Tinkercad design so you keep the proven base, rim and heights.
- Rename it
lastname-original-faux-enamel-v2. - Delete the PCSS-specific lettering and artwork.
- Prepare your original logo in Photopea as separate structure and fill-region SVGs.
- Import, align and test the new artwork using the same 3 mm base, 1 mm structure and 1.2 mm minimum wall.
- Choose two or three fill colours that give strong contrast.
- Export as
lastname-original-faux-enamel-v2.stl. - Print, fill, evaluate and revise it using evidence from Version 1.
Glue on the finding
For the 60 mm PCSS badge or a Version 2 brooch, use a 20–25 mm glue-on bar pin with a flat base. For an approved Version 2 earring, use an 8–10 mm stainless-steel flat-pad earring post with a matching back.
Lightly roughen only the glue area and remove dust. A teacher may apply a small amount of Loctite Super Glue Gel Control or another school-approved adhesive after testing it on the printed material. Five-minute epoxy is stronger and more gap-filling but requires additional handling controls. Hot glue is not a durable jewellery attachment.
Do not wear the product until the fill and adhesive are completely cured. Do not claim that an earring finding is hypoallergenic unless the supplier documents the exact material.
What to buy for one class
Search Amazon or a jewellery supplier for:
glue on brooch pin backs 20mm or 25mm;stainless steel flat pad earring posts 8mm or 10mm with backsfor approved Version 2 earrings;- teacher-approved Port Credit navy, Warriors gold and student-choice fill colours;
- toothpicks or fine disposable applicators; and
- a teacher-controlled gel cyanoacrylate or approved two-part epoxy.
Buy findings in bulk only after printing one test badge and confirming that the hardware fits the flat back.
Submit
Version 1 — PCSS practice
Submit:
- a Photopea screenshot showing the named white, navy and gold groups;
- a top-view Tinkercad screenshot showing the white text and ring structure;
- a side-view screenshot showing the 3 mm base and 1 mm raised structure;
lastname-pcss-faux-enamel-v1.stl; and- a photograph of the cured navy, gold and white badge.
Version 2 — original design
Submit:
- the original logo SVG;
- top and side screenshots of the Tinkercad model;
lastname-original-faux-enamel-v2.stl;- a photograph of the finished product; and
- a short comparison explaining what you changed after Version 1 and why Version 2 is easier to print or fill.
Success criteria
- Version 1 is recognizably based on the supplied PCSS Warriors roundel.
- The lettering and circular outlines remain clean white filament.
- Navy and gold regions are visibly different and do not bleed together.
- Every fill area is enclosed and accessible.
- The base is 3 mm, the raised structure is 1 mm and critical walls are at least 1.2 mm.
- Version 2 uses an original logo rather than copied commercial or team artwork.
- Both STL files match their editable Tinkercad models.
- The comparison identifies a specific, evidence-based improvement.
Reference
The finishing idea is adapted from Turn 3D Printed Faux Enamel Pins Into Unique Jewellery. Use it as process inspiration, not as an answer file. Version 1 uses the supplied school reference; Version 2 must use original student artwork.